
I spent three years assisting in a studio where the lead photographer would lecture us on the mathematical precision of light angles, as if we were solving calculus rather than trying to make a human being look less terrified. He had all the expensive modifiers in the world, but he still couldn’t figure out why his subjects looked like they were being interrogated by the police. The truth is, people spend way too much money on gear and not enough time learning how to feather a light to actually suit the space they’re standing in. You don’t need a more expensive softbox; you usually just need to stop pointing the center of your light directly at the person’s face and start negotiating with the shadows instead.
I’m not here to give you a lecture on the physics of inverse square law or some theoretical nonsense you’ll find in a textbook. I want to talk about what happens when you’re in a cramped rental studio with white walls that reflect everything like a mirror, or when your client is staring at you with that “I’m definitely not photogenic” expression. I’m going to show you how to use the edge of your light to control the mood without needing a whole crew to help you.
Understanding How to Feather a Light
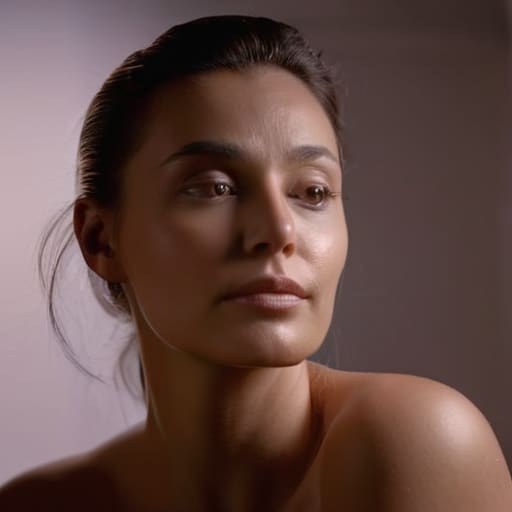
Think of feathering not as a technical setting, but as a way of negotiating with the space. When you point your modifier directly at your subject, you’re hitting them with the hottest, most aggressive part of the beam. It’s blunt. To feather, you instead aim the center of the light slightly in front of or behind them. You’re essentially using the edge of the beam to wrap around their face. This is how you get those smooth, gradient light transitions that make a portrait look intentional rather than just “lit.”
It’s also your best defense against a room that refuses to cooperate. If you’re working in a small studio with white walls that bounce everything back at you like a disco ball, you can’t afford to be direct. By angling the light away, you gain much tighter light falloff control, preventing that messy spill from washing out your background or hitting the client’s glasses at the wrong moment. It’s about shaping the light to fit the person, rather than forcing the person to exist inside a harsh, unyielding circle of brightness.
Key Things to Know

First, forget the idea that you’re just aiming a light at a face. When you’re feathering, you’re actually aiming the light past the subject. You want the edge of the beam—the part where the intensity starts to drop—to graze them. This is how you get those subtle gradient light transitions that make a portrait look expensive rather than slapped together. If you point the center of the modifier directly at your sitter, you’re going to get a hot spot on their forehead that no amount of retouching will fix.
Second, pay attention to your distance. If you’re working in a cramped studio or a client’s tiny office, you don’t have the luxury of moving the stand three meters back. This is where shaping light with modifiers becomes a survival skill. By angling the light away, you’re effectively using the falloff to wrap the illumination around the jawline. It’s the quickest way to achieve light falloff control without needing a massive softbox or a secondary fill light to rescue the shadows. It’s about working with the physics of the beam, not fighting it.
Practical Tips and Steps

First, stop pointing your modifier directly at the subject’s face. That’s the most common mistake I see when people try to fix a harsh setup. Instead, turn the light slightly away so the edge of the beam—the part that’s actually soft—is what’s hitting them. You’re essentially shaping light with modifiers by using the spill rather than the center. If you’re working with a large octa, don’t be afraid to angle it toward the background or a wall; you want to catch that reflected glow to help with light falloff control across the shoulders.
Next, watch your distance. If the transition from light to shadow feels like a sudden cliff edge, move the light closer or tilt it more aggressively. I usually find that a slight tilt creates much smoother gradient light transitions than trying to fight the modifier’s natural throw. It’s about finding that sweet spot where the light wraps around the jawline without turning the whole side of the face into a white blob. It takes a few minutes of moving the stand an inch at a time, but it’s the only way to stop the room from looking like a crime scene.
Common Mistakes to Avoid
The biggest mistake I see—and I’ve made it myself when I was still just carrying bags for other people—is treating the light like a blunt instrument. People often think that if the light is too harsh, they just need a bigger softbox. But if you’re fighting a small room or a client with a very specific complexion, just adding more diffusion isn’t the answer. You end up with a flat, muddy mess. Instead of just throwing more gear at the problem, you need to focus on light falloff control. If you don’t manage how that light dies off as it moves away from the source, you’ll end up with a subject that looks like they’re being hit by a spotlight in a dark alley rather than a professional portrait.
Another trap is neglecting the way the light interacts with the background. I’ve sat in studios where the subject looks great, but the light is bleeding into the wall behind them, destroying any sense of depth. You aren’t just lighting a person; you’re shaping the entire environment. If you aren’t careful with your angles, you’ll lose those subtle gradient light transitions that make a shot feel three-dimensional. Don’t just aim the light at their face and hope for the best; watch where the spill goes.
Final Thoughts
At the end of the day, don’t get caught up in the math of it all. You can spend an hour measuring angles and reading manuals, but you’ll learn more in ten minutes of actually moving the stand and watching how the shadows dance across your subject’s face. Feathering isn’t about perfection; it’s about light falloff control that feels intentional rather than accidental. It’s the difference between a portrait that looks like a mugshot and one that actually feels like a person.
If you find yourself struggling, stop looking at your settings and start looking at the room. Sometimes you aren’t fighting the light itself, but the way it’s bouncing off a white wall or a glass window behind you. Master the art of shaping light with modifiers and learning when to step back, and you’ll stop blaming your gear when a shot feels “off.” Just keep adjusting until the light stops fighting you and starts working for you. Then, get out of the studio and go develop some film.
Five ways to stop fighting your light
- Stop aiming at the subject. If you point your softbox directly at their face and it feels too harsh, don’t reach for a dimmer or a different modifier; just turn the light away from them. Aim it at the wall behind the subject or slightly off-axis. You want the subject to catch the edge of the light spill, not the blunt force of the center of the beam.
- Watch the catchlights, not just the shadows. When you start feathering, the light in the eyes will change. If the catchlight disappears entirely, you’ve feathered too far and you’re losing the life in the portrait. You’re looking for that sweet spot where the light feels soft on the skin but still gives them a glimmer of presence.
- Mind the distance between the light and the wall. If you’re feathering a light toward a background to create a gradient, remember that the closer the modifier is to that wall, the faster the light falls off. If you want a subtle, creamy transition from light to dark, give the light some breathing room—at least 1.5 meters from the background.
- Check your shadows for “clipping.” When you feather a light to soften a look, it’s easy to accidentally plunge the shadow side of the face into total blackness. If you’re working with a single light, make sure you aren’t losing the shape of the jawline or the far cheek just because you were trying to be subtle. Sometimes a little bit of bounce from a white foam board is the only thing that saves a feathered setup from looking accidental.
- Use your hands to feel the heat, not just your eyes. This sounds unscientific, but when I’m adjusting a light to feather it across a subject’s shoulder or hair, I’m looking for how the light “wraps.” If the light feels like it’s hitting them like a flat sheet, you haven’t feathered enough. You want the light to wrap around the contours, which usually means the axis of the light is pointing somewhere else entirely.
The truth about the edge
Stop trying to find a magic modifier that creates the perfect gradient; that’s not how it works. You don’t fix a harsh light by buying better gear, you fix it by turning your light away from the subject and using the edge of the beam to wrap around them. Feathering isn’t a technical setting, it’s a negotiation between your light and the room.
Iwona Krawczyk
The Takeaway
At the end of the day, feathering isn’t some complex mathematical formula you need to memorize; it’s just about learning how to negotiate with the light instead of trying to bully it. We’ve talked about moving the modifier, angling the beam away from the subject, and that crucial step of feathering the edge to soften the falloff when the room is working against you. Remember that your goal isn’t to create a perfect, textbook shadow, but to find the specific point where the light stops looking like a harsh interrogation lamp and starts looking like something a human being actually wants to be seen in. It’s about the compromise between the gear and the space, and knowing when to stop tweaking and just start shooting.
If you leave this notebook with nothing else, leave with this: stop staring at your light meter and start looking at the way the light actually hits the skin. Most of the “magic” in a portrait isn’t found in a more expensive softbox or a higher-end strobe; it’s found in those tiny, incremental adjustments you make when you realize the light is hitting a corner too hard or washing out the eyes. Trust your eyes more than your settings. Once you stop fighting the physics of the room and start working with the falloff, you’ll realize that the best shots usually happen in that sweet spot where you finally stopped overthinking and just let the light do its job.
