
I remember sitting on a cold studio floor three years ago, surrounded by three expensive softboxes and a client who was staring at my monitor with pure, unadulterated dread. We were trying to shoot a high-end perfume bottle, and every time I thought I had the glow right, the glass would catch a stray window reflection or a giant, ugly black blob of my own silhouette. People will try to sell you a thousand-dollar kit of specialized polarizers and diffusion panels to solve this, but let me tell you: the gear isn’t the magic fix. Most of the time, when you’re struggling with how to light reflective objects, the problem is simply that you haven’t accounted for the unseen geometry of the room.
I’m not here to give you a lecture on the physics of light refraction or a shopping list of gadgets you don’t need. Instead, I want to talk about the actual, messy work of managing what you see in the reflection. I’m going to show you how to use a single light and a large piece of white foam core to create shape without the chaos, and how to negotiate with the surface until it finally behaves. This is about the practical compromises that turn a distracting glare into a controlled highlight.
The Mirror Isnt the Enemy How to Light Reflective Objects
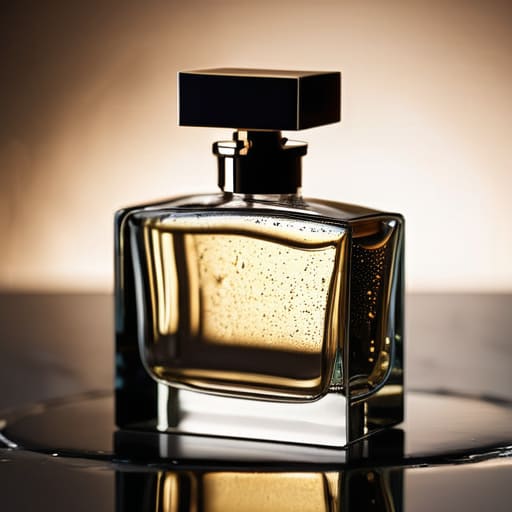
The first thing you have to accept is that you aren’t actually lighting the object; you are lighting the environment around it. If you’re shooting a polished chrome teapot or a glass perfume bottle, that surface is just a curved mirror waiting to ruin your afternoon. Most beginners try to fight it by turning the power down, but that’s a losing battle. Instead, you need to focus on specular highlights control. If you see a tiny, angry white dot of light on a metallic surface, it’s because your light source is too small and too direct.
My go-to move is to stop thinking about the object and start thinking about the shape of the reflection. I usually swap my standard grids for massive softbox usage for shiny surfaces, or even better, I’ll flag the light with a large piece of black foam core to create “negative fill.” This gives the object those dark, elegant edges that define its shape. If you’re still seeing a mess of unmanageable glare, don’t panic—sometimes a polarizing filter is the only way to save the shot without rebuilding your entire studio from scratch.
Fighting the Glare Managing Chaos in the Studio

When you’re staring at a polished chrome teapot or a glass perfume bottle, the instinct is to pull the lights back and hope for the best. Don’t. That just results in a muddy, underexposed mess. Instead, you need to treat the object like a mirror. If you see a massive, ugly white blob on the surface, your light is too direct. I usually lean heavily on diffused lighting techniques to solve this; I’ll wrap my strobe in a large silk or move a heavy scrim between the light and the object. You aren’t trying to light the object itself so much as you are lighting the surface it’s going to reflect.
If the diffusion isn’t enough, you have to get aggressive with your positioning. I’ve spent more time than I’d like to admit moving a single light three inches to the left just to shift a hot spot out of the frame. Sometimes, if you’re fighting a stubborn, curved surface, polarizing filters for reflections can be your best friend to kill that surface glare without moving a single stand. It’s a game of inches and angles. If the reflection looks like a disaster, move the light, move the object, or change the modifier. Just don’t stand there staring at the monitor wishing the glare would go away.
Taming the Light Mastering Specular Highlights Control

If you’re staring at a polished chrome kettle or a glass bottle and seeing nothing but a giant, blown-out white blob where the detail should be, you aren’t failing at photography; you’re just fighting physics. This is where specular highlights control becomes your entire job. Instead of trying to blast the object with light to “overcome” the reflection, you have to treat the reflection as the subject itself. I usually start by moving my light source further away—sometimes three or four meters—and using a much larger modifier. The goal is to make the reflection something manageable, like a soft gradient, rather than a sharp, distracting puncture wound of light.
I’ve learned the hard way that a standard umbrella is often too messy for this. I prefer using a large octabox with a heavy diffusion silk sandwiched in front of it. This kind of diffused lighting technique turns those harsh, angry glares into soft, elegant shapes that actually define the object’s contour. If you’re still seeing a stubborn hotspot that refuses to budge, don’t reach for more power; reach for a piece of black foam core. Sometimes, the best way to control a highlight is to shape the shadow right next to it.
When Everything Is Too Sharp Diffused Lighting Techniques
Sometimes, you realize that fighting the reflection is a losing battle, and you just need to wrap the light in a blanket. If you’re dealing with something particularly aggressive, like a polished chrome teapot or a high-gloss perfume bottle, stop trying to aim a direct beam at it. Instead, pivot toward diffused lighting techniques that turn your light source into a massive, soft surface. I usually grab my largest octabox or even a silk scrim and position it so the object is essentially “looking” at the silk rather than the lamp. It turns those jagged, distracting hot spots into a smooth, predictable gradient that actually makes the material look expensive rather than messy.
If the diffusion isn’t enough, don’t be afraid to get messy with your positioning. I’ve spent more time than I care to admit angling a silver tray just a few degrees to the left because the direct reflection of my softbox was killing the shot. When you’re working with studio lighting for metallic objects, remember that you aren’t just lighting the object; you are lighting the reflections on the object. If the reflection looks like a blob, your modifier is too small or too close. Adjust the distance, change the angle, and stop treating the light like a spotlight and start treating it like a landscape.
Softbox Usage for Shiny Surfaces and Unruly Metals
If you’re staring at a piece of polished chrome or a glass bottle and thinking you need a massive, multi-point setup, stop. You don’t. In fact, the more lights you throw at a shiny surface, the more ways you give it to reflect something you didn’t intend. When I’m dealing with studio lighting for metallic objects, my first instinct is to shrink the light source. I’ll grab a medium softbox—nothing too huge that swallows the room—and place it at an angle where the reflection actually looks intentional. You aren’t just lighting the object; you are literally sculpting the reflection that lives on its surface.
The trick with softbox usage for shiny surfaces is understanding that the softbox becomes the subject’s new “environment.” If you use a strip box, you get those long, elegant lines of light that define a curve without washing out the texture. If the reflection is still looking too harsh or “hot,” don’t just back the light away. Instead, try a layer of diffusion paper between the softbox and the object. It’s a small compromise, but it turns a distracting, jagged glare into a soft, controlled gradient that makes the metal look expensive rather than messy.
Polarizing Filters for Reflections and Lost Control
If you’ve spent an hour trying to move a light three inches to the left only to have a tiny, blinding white dot appear on a glass bottle, you’ve reached the point where you need to stop fighting the physics and start using a tool. I used to think polarizing filters for reflections were just for landscape photographers trying to see through water, but they are a lifesaver when you’re dealing with studio lighting for metallic objects or polished surfaces. A circular polarizer won’t kill every single reflection—it’s not magic—but it can dial down the intensity of that annoying glare just enough to let the actual color and texture of the object breathe.
The trick is that you can’t just slap it on and walk away. You have to rotate it while watching your monitor, searching for that specific “sweet spot” where the surface stops screaming at you. It’s a bit of a dance, and it works best when you’ve already done the heavy lifting with your diffused lighting techniques. Think of the polarizer as your final layer of defense; it’s there to clean up the mess when the light is behaving, but the reflections are still being stubborn.
Five ways to stop chasing highlights and start controlling them
- Stop trying to hide the reflection and start shaping it. If you’re shooting a glass bottle or a polished watch, don’t just point a light at it and hope for the best; treat the reflection like a physical shape. If the reflection looks like a messy blob, it’s because your light source is too large or too close. Move the softbox back, or better yet, use a strip box held at a sharp angle so the reflection becomes a clean, elegant line rather than a white smear.
- Watch your angles, because physics doesn’t care about your composition. I’ve spent way too many hours moving a light just two inches to the left because the reflection was hitting the lens dead-on. Remember the rule: if the light hits the object and bounces straight into your glass, you’re going to see it. Tilt the object, tilt the light, or tilt your head—just get that bounce out of your line of sight.
- Use “negative fill” to create depth when things get too shiny. Sometimes, a reflective object picks up everything in the room—the white walls, the ceiling, even your own shadow. If the metal looks flat and lifeless, put a black foam core board just out of frame on the opposite side of your light. It gives the reflection something dark to bite into, creating those crucial edges that actually make an object look three-dimensional.
- The “Black Flag” trick is your best friend for small, high-shine details. If you have a silver ring or a polished piece of jewelry that’s reflecting your entire studio, take a small piece of black card and hold it right near the object. You aren’t blocking your main light; you’re just giving the shiny surface a dark “anchor” to reflect, which instantly defines the shape.
- Check your distance, and I mean really check it. When I’m working with highly reflective surfaces, I’ve learned that the closer the light, the more “aggressive” the specular highlight becomes. If the glare is blowing out your highlights and making the texture disappear, back the light off. You’ll lose a bit of intensity, but you’ll gain the ability to actually see the surface of what you’re shooting.
## Stop Fighting the Surface
You can spend three hours repositioning your lights, praying for a miracle, but the physics of a chrome teapot aren’t going to change just because you’re frustrated. Stop trying to overpower the reflection and start treating the object like a mirror; you aren’t lighting the object itself, you’re lighting the room around it and letting the object just sit there and catch the pieces.
Iwona Krawczyk
The Reality of the Reflection
At the end of the day, lighting something shiny isn’t about mastering a complex mathematical formula; it’s about a constant, exhausting negotiation with the room. You’ve learned that you can’t just blast a silver teapot with a bare strobe and hope for the best. You have to move the softbox, tilt the flag, maybe even grab that polarizing filter you usually leave in the bag, and accept that the light will always find a way to bounce where you don’t want it. Whether you are fighting a specular highlight that’s blowing out your highlights or trying to soften a harsh reflection on a glass vase, remember that control is often an illusion. You aren’t conquering the light; you are just managing the chaos well enough to get the shot.
If you find yourself staring at a subject that seems determined to reflect every single mistake you make, take a breath and step back from the viewfinder. Sometimes the best solution isn’t a new modifier, but simply changing your angle by ten degrees or dimming the overheads. Photography is often less about the “perfect” setup and more about the stubborn persistence required to fix what’s going wrong in real-time. Don’t let a stubborn piece of chrome ruin your mood. The gear is ready, the light is behaving—mostly—and now it’s just down to you and the object. Go make it happen.
