
I once spent forty-five minutes in a drafty studio in East London, sweating through my shirt while trying to justify a massive softbox setup to a client who just wanted “something natural.” I was staring at my light meter, obsessing over Kelvin temperatures, when I realized the most beautiful light in the room was coming from that single, slightly grimy window in the corner. We spend so much time chasing expensive modifiers and complicated lighting diagrams that we forget the most basic lesson in how to use a window for a portrait: it’s not about the gear you bring, it’s about how you negotiate with the room.
I’m not going to give you a lecture on the physics of light or tell you to buy a specific brand of reflector. Instead, I want to talk about the actual, messy reality of working with what you’ve got. I’ll tell you exactly where to position your subject, how to deal with that one patch of harsh direct sun that ruins everything, and why a simple sheer curtain is often better than any strobe you can buy. This is the practical side of the craft—the stuff they don’t teach you in the expensive workshops.
Stop Blaming Your Gear and Start Looking at the Window
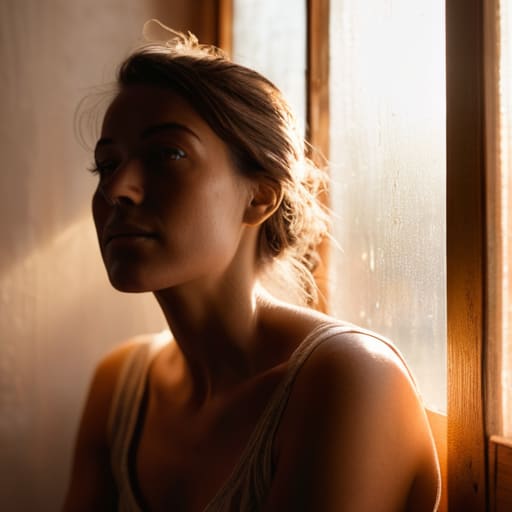
Stop blaming your gear and start looking at the window
I spent my first three years assisting seeing people panic because they forgot a softbox or their strobe wouldn’t fire, only to realize the light they actually needed was right behind them. We spend so much time obsessing over sensor dynamic range that we forget the most powerful modifier in the room is the glass in the frame. If you’re staring at a screen wondering why your shots look clinical or flat, stop tweaking your ISO and start looking at the direction of the sun. The difference between soft light vs hard light window setups is often just a matter of whether you’re shooting at 10:00 AM or 2:00 PM.
Instead of reaching for a heavy light stand, try positioning your subject near the window at a 45-degree angle. It creates a natural fall-off that no cheap LED panel can replicate. If the light feels too aggressive or the shadows are carving too deep into their face, don’t reach for a professional scrim immediately; just pull a sheer white curtain across the pane. It’s the simplest way of diffusing natural light for portraits without turning your studio into a construction site.
Mastering How to Use a Window for a Portrait

Once you’ve stopped staring at your light meter and actually looked at the glass, you need to figure out the quality of what’s coming through. This is the classic battle of soft light vs hard light window conditions. If it’s a bright, direct sun hitting the pane, you’re going to get harsh, unforgiving shadows that make everyone look like they’re in a noir film—which is fine for a moody editorial, but a nightmare for a corporate headshot. If the sun is too aggressive, don’t panic; just hang a thin white bedsheet or a piece of sheer fabric over the frame. Diffusing natural light for portraits is often the difference between a shot that looks professional and one that looks accidental.
Then there’s the matter of where the person actually sits. I usually find that positioning the subject near the window at a forty-five-degree angle creates the most flattering shape, but you have to watch the fall-off. If they move even six inches too far from the light source, the side of their face will drop into total darkness. If you find the shadows are getting a bit too heavy on the dark side, don’t reach for a second strobe. Just grab a piece of white foam core and use it for using reflectors with window light to bounce a little bit of that brightness back into the shadows.
The Messy Reality of Soft Light vs Hard Light Window

Here is the reality: the light coming through that window is never going to be “perfectly” anything. It’s either going to be a harsh, direct beam that makes your subject squint and highlights every uneven texture on their skin, or it’s going to be a flat, muddy grey that lacks any sense of dimension. When you are navigating the soft light vs hard light window dilemma, you have to stop waiting for the “right” moment and start managing what you actually have.
If the sun is hitting the glass directly, you’re dealing with hard light—it’s dramatic, sure, but it’s unforgiving. I usually find myself scrambling for a sheer white curtain or a piece of foam core to act as a makeshift scrim. If you don’t have that, you’re stuck diffusing natural light for portraits using whatever is at hand, or leaning into those deep, moody shadows. On the flip side, a cloudy day gives you that lovely, wrap-around softness, but it can also feel lifeless. In those cases, I’m usually using reflectors with window light just to kick a little bit of bounce back into the shadows so the subject doesn’t look like they’re melting into the background.
Positioning Subject Near Window to Find the Right Mood
Once you’ve accepted whether you’re working with a harsh sunbeam or a dull, grey afternoon, you have to move the person. I always tell my assistants that the window isn’t just a light source; it’s a directional tool. If you want that classic, moody look, don’t face them directly toward the glass. Instead, try positioning the subject near the window at a forty-five-degree angle. This creates a gradual fall-off of light across the face, which is much more flattering for most people than the “deer in headlights” look you get from frontal lighting.
If the shadows are getting too aggressive or carving too deep into their features, don’t panic and reach for a second strobe. That’s how you lose the natural feel. Just try using reflectors with window light to gently bounce some brightness back into the dark side of their face. A simple white foam board tucked just out of frame can be the difference between a portrait that looks professional and one that looks like a mistake. It’s about finding that sweet spot where the shadow is present but doesn’t feel like it’s swallowing them whole.
Controlling Window Light Shadows Without Losing the Soul
Here is the problem with window light: it’s often too dramatic. You find that perfect spot, the subject settles in, and suddenly you’ve got a shadow cutting right across an eye or a nose that looks like it belongs in a film noir. You aren’t trying to shoot a moody detective; you’re trying to take a portrait that doesn’t look like a crime scene. Controlling window light shadows isn’t about killing the light entirely, but about managing how it falls. If the transition from light to dark is too aggressive, you’ve lost the nuance of their expression.
I usually reach for a simple white foam board or a large reflector to bounce a bit of that spill back into the shadows. It’s one of those basic natural light portrait techniques that people overlook because it feels too “amateur,” but it works. If you’re too close to the window, the fall-off is brutal; if you move them a foot back, the light softens. My rule of thumb is to find the middle ground where the shadows are present but not punishing. You want depth, not a void.
Using Reflectors With Window Light to Fix the Room
When the window light is doing its job but the shadow side of the face looks like a black hole, don’t reach for a second strobe. That’s how you ruin the mood and end up with a flat, artificial mess. Instead, try using reflectors with window light to just gently nudge that shadow back into reality. I usually keep a large 5-in-1 circular reflector nearby, not because I want a perfect, even glow, but because I need to tame the darkness just enough so the subject doesn’t feel like they’re being swallowed by the room.
If you’re working in a tight corner, a white foam board is often better than a fancy professional reflector. It’s less aggressive. I’ll place it about two feet from the subject, just out of frame, to catch that spill and bounce it back into the eyes. It’s a subtle way of controlling window light shadows without making the whole scene look like a high-budget commercial. You aren’t trying to erase the shadows; you’re just making sure the viewer can still see the shape of the jawline.
Five things I wish I knew before I started chasing the sun
- Watch the clock, not just the light. A window that looks like heaven at 10:00 AM can turn into a harsh, high-contrast nightmare by noon. If you’re shooting a portrait, check the direction of the sun twenty minutes before the client arrives so you aren’t scrambling to move a heavy desk when the light turns aggressive.
- Don’t be afraid of a little “bad” light. If the window is small and the light is coming in in a narrow, hard stripe, don’t try to fix it with a massive softbox. Lean into it. Use that sliver of light to create a moody, Rembrandt-style shadow on the far side of the face. Sometimes the “imperfection” is exactly what makes the portrait look human.
- Mind the background clutter. When you use a window, your eye is naturally drawn to the light, but if there’s a messy pile of cables or a half-eaten sandwich just three feet behind the subject, the viewer will see it. Pull the subject further away from the wall to create depth, or at least make sure the background is as quiet as the light.
- Use a sheer curtain as a cheap, effective modifier. If the light is hitting your subject’s nose like a spotlight, don’t reach for a professional scrim immediately. A simple, white linen curtain pulled across the window can turn that punishing direct sun into a soft, milky glow that’s much more forgiving on skin textures.
- Check the “catchlight” in their eyes. This is the one thing I always look for before I even tell a subject to smile. If they are positioned near the window but their eyes look flat or “dead,” you’ve lost the connection. Shift them just six inches closer or slightly more angled toward the glass until you see that tiny spark of light reflected in their pupils.
The window is your boss
You can spend three hours trying to balance a four-light setup only to realize you’re fighting the architecture of the room, or you can just pull a chair up to a single window, accept the shadows for what they are, and actually start shooting.
Iwona Krawczyk
The takeaway
Look, at the end of the day, you aren’t trying to solve a physics equation; you’re just trying to manage a room. We’ve talked about moving the subject closer to the glass to kill the shadows, using a simple white foam board to catch the spill, and knowing when to embrace that harsh, direct sun instead of fighting it. It’s about realizing that the window is your primary light source, your modifier, and your biggest unpredictable variable all at once. If you can master the compromise between the light and the space, you won’t need to panic when your expensive strobe fails or the client shows up with a mood that doesn’t match your pre-planned setup. It’s about reading the light before you even think about touching your shutter button.
Don’t get caught in the trap of thinking you need a controlled studio environment to make something beautiful. Some of my best portraits—the ones that actually feel like they have a pulse—were shot in drafty rooms with nothing but a single pane of glass and a bit of luck. Stop obsessing over your gear list and start paying attention to how the light falls across a person’s face. Once you stop fighting the environment and start working with the reality of the room, you’ll find that the most honest images are often the ones you didn’t have to manufacture. Now, go find a window and just start shooting.
